The short answer
Put a low-pass filter on the sound and drag its cutoff down to about 400–800 Hz. Add a short, quiet room reverb and turn the level down 3–6 dB. That's the "party next door" sound, in every app below.
Why muffled audio sounds muffled
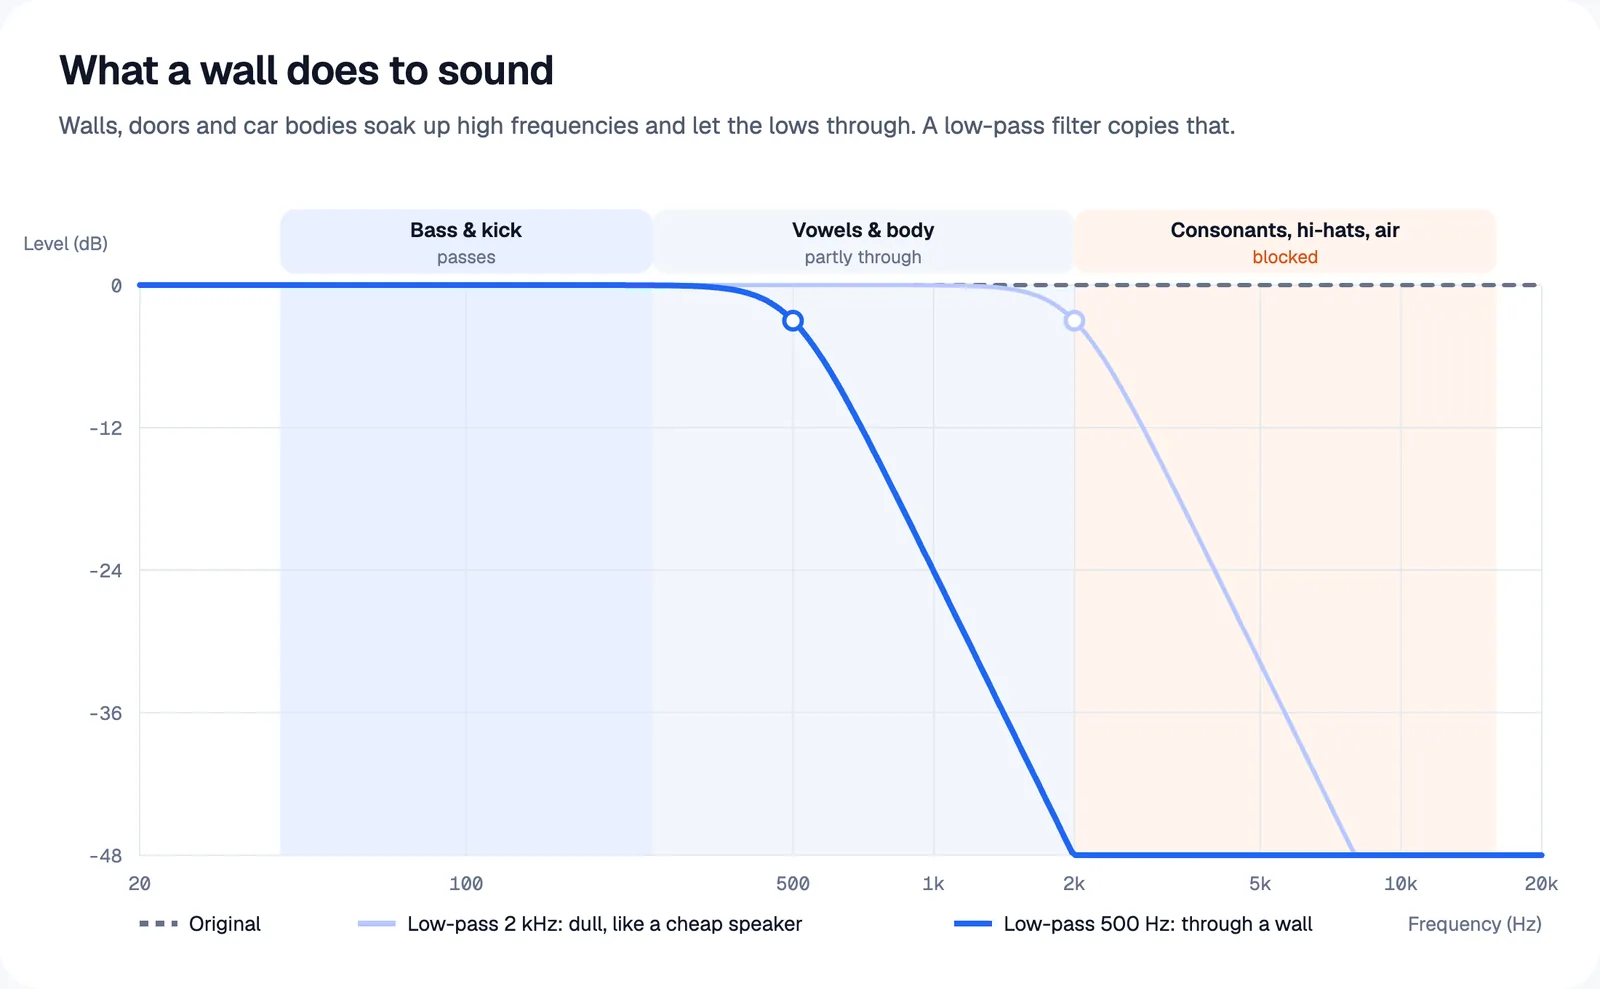
Walls, doors, car bodies and pillows all soak up high frequencies and let the lows through. That's why you hear the bass from a party next door but not a single word. The consonants that make speech clear (s, t, k) and the shimmer of cymbals sit above about 2 kHz; vowels sit between 250 Hz and 2 kHz; bass and kick sit below 250 Hz.
A low-pass filter copies that wall. Everything below its cutoff passes, everything above fades away. Four other settings shape the result:
- Slope: 12 dB per octave sounds soft and natural; 24 dB per octave sounds like a solid wall.
- Resonance (Q): keep it low. Resonance adds a whistling peak at the cutoff, which sounds like a synth sweep rather than a room.
- Room: a short, quiet reverb tells your ear the sound is somewhere else.
- Level: quieter reads as farther away.
Make audio sound muffled online (fastest)
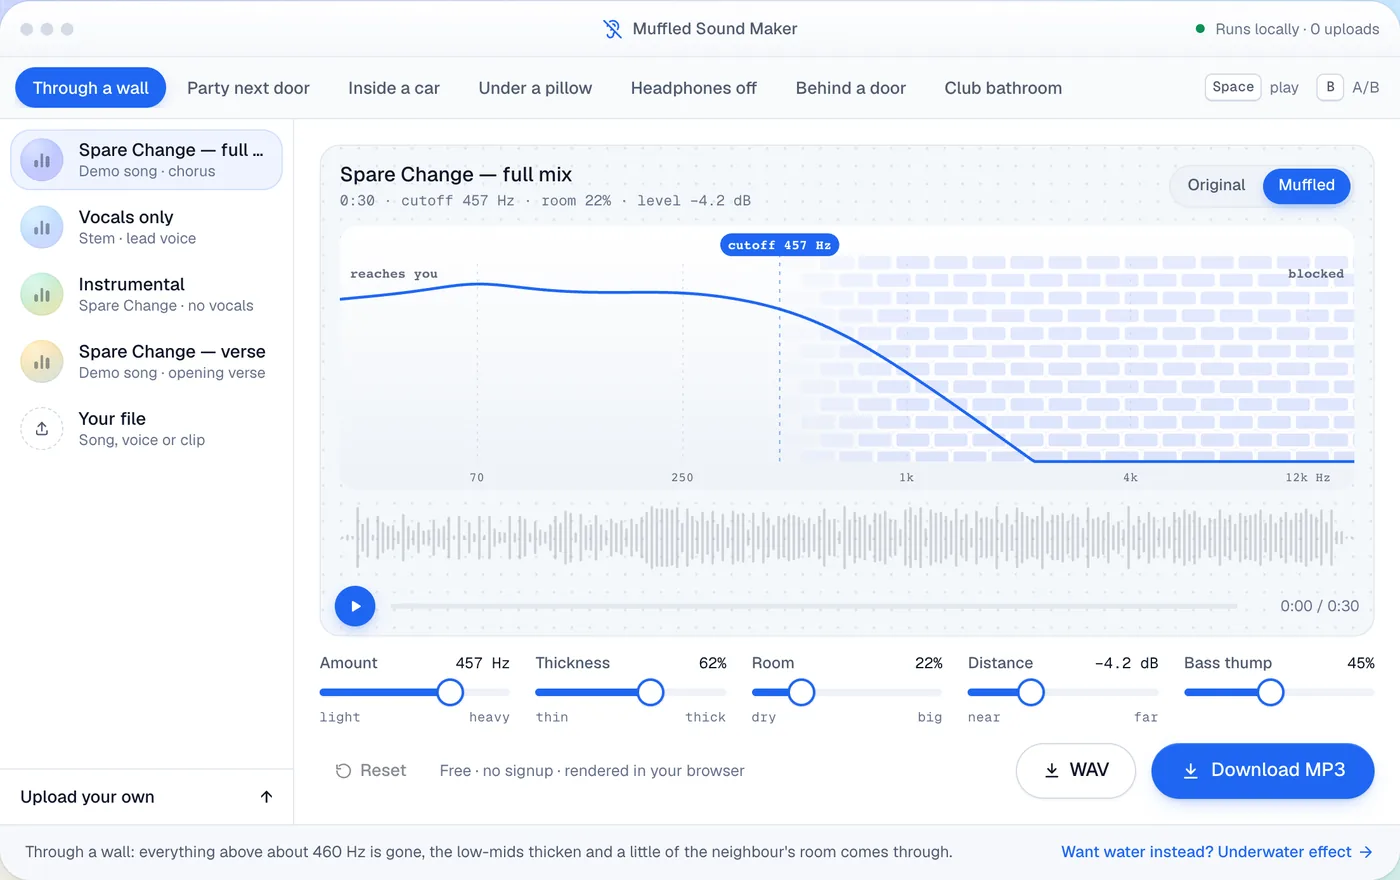
If you just need the effect on a file, our Muffled Sound Effect tool does it in the browser with seven presets for the usual scenes: Through a wall, Party next door, Inside a car, Under a pillow, Headphones off, Behind a door and Club bathroom. Nothing is uploaded and there's no signup.
- 1
Add your audio
Drop in an MP3, WAV or M4A file, or start with a demo track.
- 2
Pick a preset
Start with Through a wall or Party next door, then fine-tune Amount, Thickness, Room, Distance and Bass thump.
- 3
Download
Save the muffled audio as MP3 or WAV and drop it into CapCut, Premiere or your DAW.
Drag the handle to compare six seconds of a song before and after a 500 Hz low-pass with a small room: the drums and bass stay, the top goes dark.
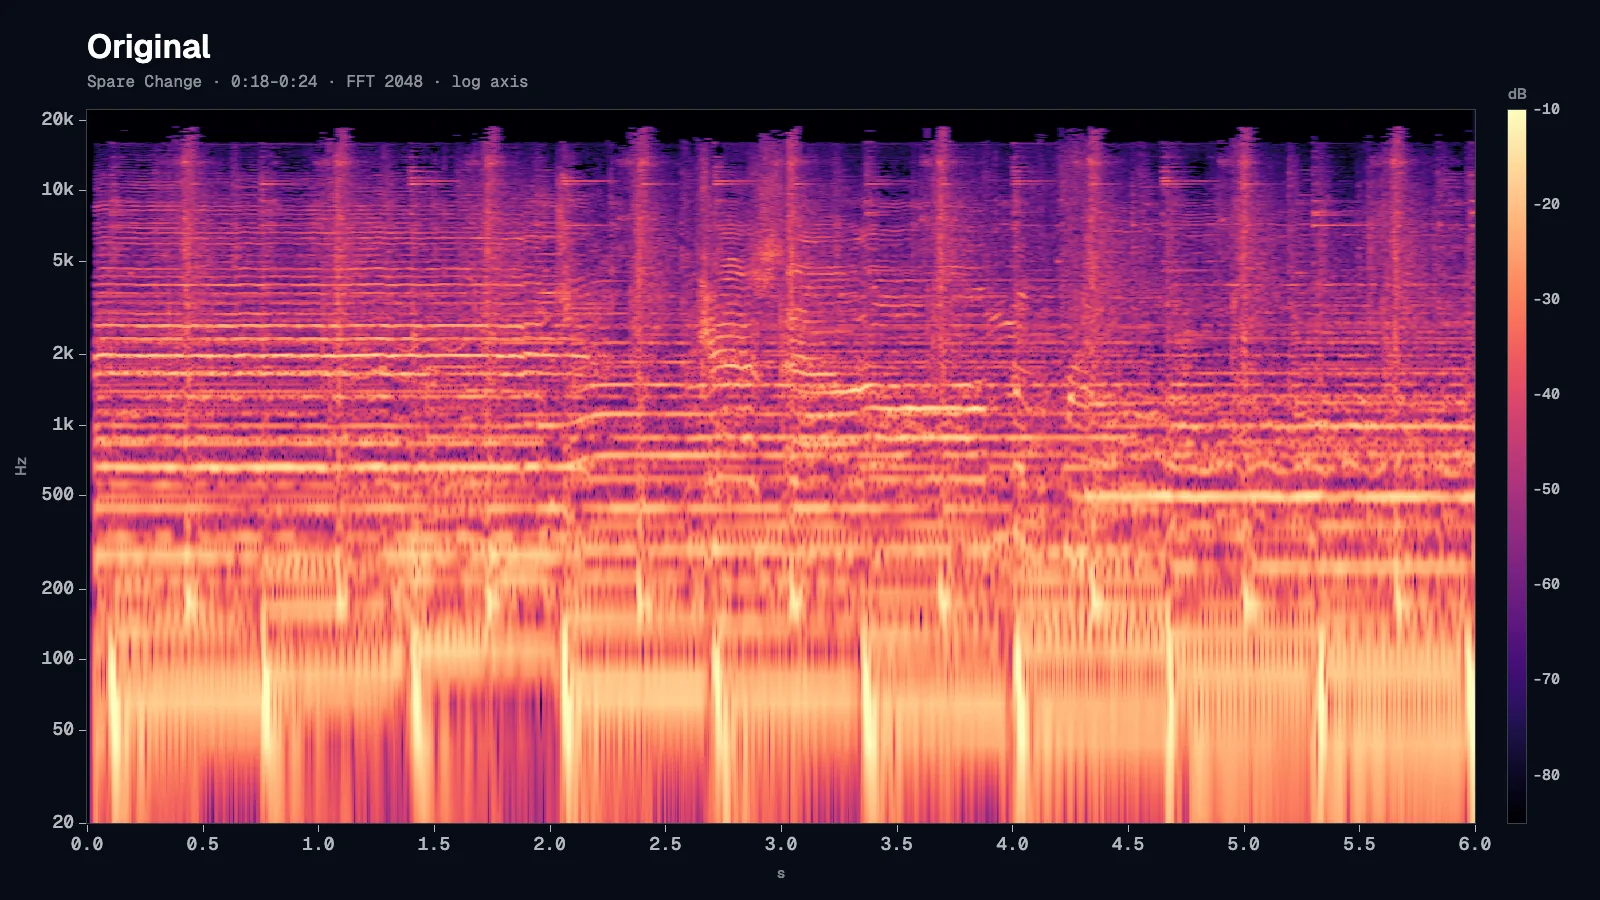
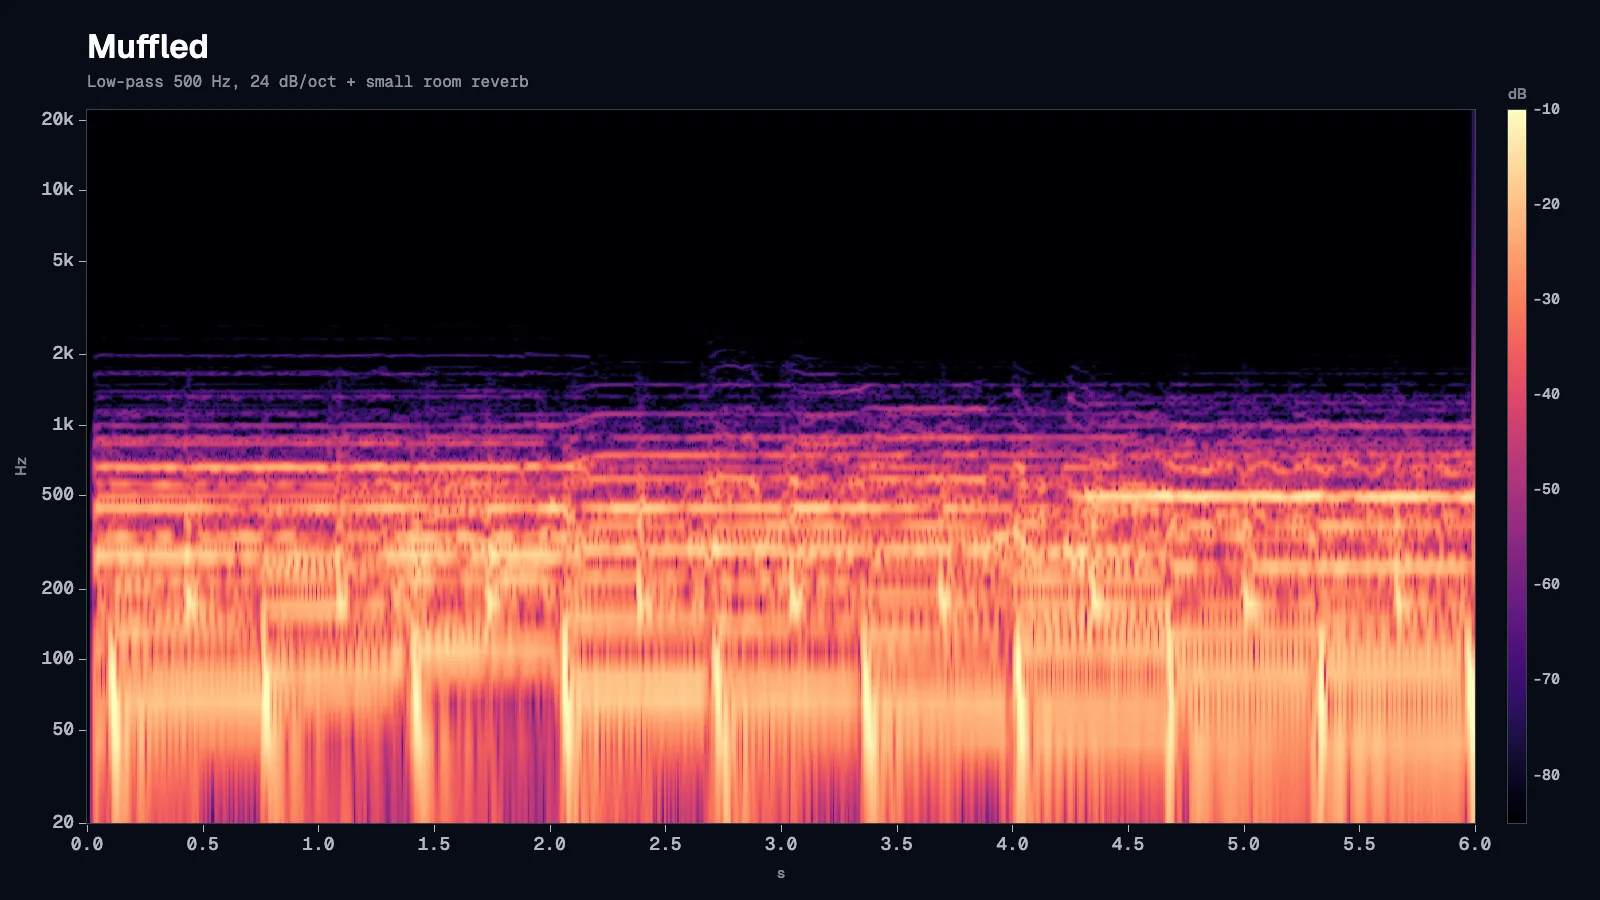
Rendered with our own spectrogram engine. Left: original. Right: muffled.
Checked November 2026
The app steps below were checked on 16 November 2026 against the official FL Studio manual, CapCut's own pages, Adobe's Premiere help, Blackmagic's DaVinci Resolve 21 pages and the Audacity manual. If a label differs in your version, pick the closest match.
How to make audio sound muffled in FL Studio
FL Studio has two stock plugins that do the job: Fruity Filter (quick) and Fruity Parametric EQ 2 (precise).
- 1
Give the sound its own mixer track
Select the channel in the Channel Rack, right-click a free mixer track and choose Channel routing → Route selected channels to this track (Ctrl+L).
- 2
Load Fruity Filter
Click the small arrow on an empty effect slot and pick Fruity Filter from the list (or drag it in from the Plugin Picker, F8).
- 3
Pull the cutoff down
Keep Low Pass up and Band Pass and High Pass down, then turn Cutoff Freq down until the words disappear, roughly 400–800 Hz for a wall. Keep Resonance low and switch on x 2 for cleaner output.
- 4
Add the room
In the next slot, load Fruity Reeverb 2 with a small SIZE, short DEC, low WET and a low H.CUT so the reverb is muffled too.
Want a steeper wall? In Fruity Parametric EQ 2, set the rightmost of its seven bands to Low Pass (drag its band-type selector, or right-click the band token → Type → Low Pass), drag the token to 500–800 Hz and drag the slope dots down to Steep 4 (−24 dB/octave).
The classic producer move: automate Cutoff Freq from about 500 Hz to fully open right before the drop, and the track walks through the door into the party.
How to muffle audio in CapCut (PC and mobile)
CapCut has no dedicated low-pass control in its help pages (checked November 2026). Its voice effects are the closest thing, and CapCut's own pages name filters such as Lo-Fi, Megaphone, Telephone, Echo and Deep. Which filters you see depends on your version and region, and some are Pro-only.
- Desktop (Windows / Mac): select the clip (for a video, right-click it and choose Extract audio to work on the sound alone), open Audio → Voice changer → Voice filters in the right-hand panel, pick a lo-fi or telephone-style filter and lower its strength slider. Then turn the clip volume down a few dB.
- Mobile (iPhone / Android): tap the clip, open the audio or voice effects menu in the bottom toolbar and choose a voice filter the same way.
For a real through-a-wall sound, muffle the file in our Muffled Sound Effect tool first and import the MP3 into CapCut as an audio track. (CapCut's own noise-reduction page warns that overdoing noise reduction can make a voice sound "underwater": the accidental version of this effect.)
How to make audio sound muffled in Premiere Pro
Adobe's help pages (updated January 2026) now call the desktop app simply Premiere; the steps are the same.
- 1
Open the audio effects
Choose Window → Effects and expand Audio Effects → Filter and EQ.
- 2
Add Lowpass
Drag Lowpass onto the clip. In Effect Controls, set Cutoff to 500–800 Hz.
- 3
Need it steeper?
Use Parametric Equalizer instead: switch on its low-pass band and set the frequency there.
- 4
Add a small room
From the Reverb category, add Studio Reverb with a small room and a low mix. Keyframe the cutoff if the sound should open up later.
How to make audio sound muffled in DaVinci Resolve
In DaVinci Resolve 21, Blackmagic says clip EQ has 6 bands on the Cut, Edit and Fairlight pages, the same as the mixer EQ.
- Select the clip, open Inspector → Audio → Equalizer and switch it on.
- Use the highest band, set its type to a high-cut (low-pass) shape and pull the frequency down to 500 Hz–1 kHz. Band labels have changed between versions; older versions had a 4-band clip EQ with the filter on the last band.
- To muffle a whole track, double-click the EQ area of its channel strip in the Fairlight mixer and do the same there.
- Add a short Fairlight reverb for the room, at a low level.
How to make audio sound muffled in Audacity
Select the audio, then choose Effect → EQ and Filters → Low-Pass Filter. Set Frequency to 500–800 Hz and pick a steep Roll-off such as 24 dB per octave. The Audacity manual suggests running the effect again, or using a steeper roll-off, if you want more. Finish with Audacity's Reverb effect at a low mix.
Settings for common muffled scenes
These starting points match the presets in our tool and work in any editor; trust your ears.
| Scene | Filter | Room | Level |
|---|---|---|---|
| Through a wall | Low-pass 400–500 Hz, 24 dB/oct, a little extra bass | Small | −4 to −8 dB |
| Party next door | Low-pass 300–400 Hz + bass boost around 70 Hz | Medium room | −6 to −8 dB |
| Behind a door | Low-pass 800 Hz–1 kHz, 12–24 dB/oct | Small | −4 to −6 dB |
| Inside a car, heard from the street | Low-pass 350–450 Hz + big bass boost | None | −3 dB |
| Under a pillow | Low-pass 200–250 Hz | None | −2 dB |
| Headphones off | High-pass ~300–400 Hz + low-pass ~4 kHz (thin, not boomy) | None | −8 to −12 dB |

Going further than muffled? The Underwater Audio Effect adds a darker filter and a gentle wobble.
Why does my audio sound muffled?
If you didn't ask for the effect, one of these is usually behind it:
| Cause | Fix |
|---|---|
| Mic covered by clothing, a hand or a phone case | Clip the lav above the fabric; clear the mic hole |
| Too far away, or talking into the side of the mic | Speak into the front from about 10–20 cm |
| Bluetooth headset mic (narrow call bandwidth) | Record with the phone's own mic or a wired mic |
| Heavy noise reduction or voice enhancement | Lower the amount, or turn it off and compare |
| Low-bitrate export or a low sample rate | Export 192 kbps or higher at 44.1 or 48 kHz |
| A filter or EQ preset left switched on | Bypass the effects chain and listen again |
To rescue a dull recording, cut a little around 200–400 Hz and lift 2–5 kHz by 2–4 dB with the Audio Equalizer. It can't restore highs that were never recorded, though; if the mic was covered, record again.